
Medium Format Forum
You are using an out of date browser. It may not display this or other websites correctly.
You should upgrade or use an alternative browser.
You should upgrade or use an alternative browser.
Silver Efex Pro B&W Conversions
- Thread starter bensonga
- Start date


Good! I was really confused when you said the sliders weren't there.
The trick with Nik Silver Efex is to play with it a lot ... since it is a layer, no worries about the original.
Do not think that the presets are set in stone ... once you choose one that's close to what you want you can modify it as much as you wish.
For example, I often use Push Process-1 for my Leica M9 shots, but tame the contrast a little with the Global Adjustments for shadow and highlight ... and almost always use the grain slider to the far right for finer grain, but harden the grain structure.
You will also note that there are two ways to deal with B&W color filtration ... click on the color dots and watch what each does to an image. For example, a color shot that is heavily contaminated with tungsten light, especially from today's energy saving bulbs, can be correct in a wholesale manner with one color dot filter.
In past, I have had some difficulty with certain cameras when converting to B&W in PS. For example the Leica M8 was a tad difficult for color because of the IR issue, but a terrific camera for B&W ... when I upgraded to the M9 I struggled to get the same B&W snap ... Nik Silver Efex fixed that issue immediately. Same for conversions with the Sony A900 and the Zeiss A mount optics ... best 35mm DSLR for color I've ever used due to the great mid-tone response, but flat when converted to B&W which tends to want a sharper contrast look. Nik to the rescue again.
Have fun!
-Marc
BTW, if you have a layer that was created in Nik, you can select that layer and run it through Nik again. This allows you to have as many different B&W response layers as you want, and control their degree of effect using the Opacity sliders.
jotloob
Well-Known Member
- Joined
- Mar 28, 2003
- Messages
- 1,946
Yes Marc
There are many great functions in SE PRO
Most of the ones you mention , I have tested so far .
Additional to that , I find the zone system display , at the far bottom of the right function column , very usefull .
This is because I worked per ZONE SYSTEM the last 10 years of my B/W work . There is also the loupe and the histogram . Sometimes , the loup display is a bit slow , but I believe this depends on what GC you have installed .
Very useful as well is the history table , top left corner . There you can follow back , what you have applied and what you have cancelled again .
Unfortunately this history is lost when you merge the layers .
Here an other conversion . Since using SE PRO I find it rather difficult to find the best conversion . I think it depends all on your personal preferences .
I found , that sometimes , what I liked in the morning , I dislike in the evening .


Jürgen
There are many great functions in SE PRO
Most of the ones you mention , I have tested so far .
Additional to that , I find the zone system display , at the far bottom of the right function column , very usefull .
This is because I worked per ZONE SYSTEM the last 10 years of my B/W work . There is also the loupe and the histogram . Sometimes , the loup display is a bit slow , but I believe this depends on what GC you have installed .
Very useful as well is the history table , top left corner . There you can follow back , what you have applied and what you have cancelled again .
Unfortunately this history is lost when you merge the layers .
Here an other conversion . Since using SE PRO I find it rather difficult to find the best conversion . I think it depends all on your personal preferences .
I found , that sometimes , what I liked in the morning , I dislike in the evening .
Jürgen

jotloob
Well-Known Member
- Joined
- Mar 28, 2003
- Messages
- 1,946
Here is one I did today, Panatomic X and yellow filter:
Before:

Is that panatomic X a HDR program ? ? ?
I dislike the colors because they turn the image into an unrealistic scene .
The B/W image looks rather dramatic , as if there was a heavy storm .
What lens did you use for that image ? ? ? Did you shoot handheld ? ? ?
I think it would be a great image , if the foreground would be sharp , which is not .
Jürgen
The image was taken on a Canon 5Dmk2 with a 12-24mm Sigma lens at 12mm with a 8x ND Grad held in front of the lens (no filter thread on the 12-24 Siggy). 12mm on FF DSLR is verrrry wide and not the sharpest but hey ho it was the only lens that goes that wide and that I owned at the time. The sky that early morning was very dramatic at times.
Sorry you don't like the colours, there would have been a slight colour shift in the sky due to the non-neutral colour of the grad filter which I have tried to correct and may have slightly changed the colour of the rocks and kelp slightly. I may have also played around with the sky a bit but as this was taken and processed a fair while ago (I have not had a Canon camera for months and the 12-24 Sigma went long before that), I can not be 100% certain. The reason for posting an older image was that I went through a load of older images looking for some that I thought might be suitable to give the 'Nik Silver Efex Pro 2' treatment and this was one of those that I choose.
The rocks and mud in South Devon do have a very red hue and this often has an effect on other items that live and grow on it.
Faux 'tilt effect' Sidmouth, South Devon.

Panatomic X is a film type in Silver Efex Pro 2, as is the yellow filter but I cant remember what style I chose as a starting point
Sorry you don't like the colours, there would have been a slight colour shift in the sky due to the non-neutral colour of the grad filter which I have tried to correct and may have slightly changed the colour of the rocks and kelp slightly. I may have also played around with the sky a bit but as this was taken and processed a fair while ago (I have not had a Canon camera for months and the 12-24 Sigma went long before that), I can not be 100% certain. The reason for posting an older image was that I went through a load of older images looking for some that I thought might be suitable to give the 'Nik Silver Efex Pro 2' treatment and this was one of those that I choose.
The rocks and mud in South Devon do have a very red hue and this often has an effect on other items that live and grow on it.
Faux 'tilt effect' Sidmouth, South Devon.
Panatomic X is a film type in Silver Efex Pro 2, as is the yellow filter but I cant remember what style I chose as a starting point
Great stuff here....keep it coming! I feel Jurgen's Silver Efex Ghost watching my every move now. ")
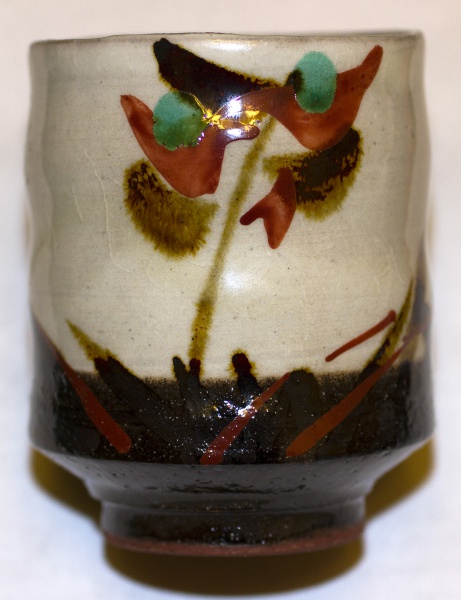
Here's a quick shot and SE Pro conversion I did the other evening. Desperate for an image to kick off my 2012 PAW project (Picture a Week), since I had already missed the first two weeks of the year. I was having a cup of Nigori sake and spotted this Japanese tea cup on the shelf, next to the sake cups. This is one in a set of four exquisite Japanese tea cups (they are quite small) which my wife purchased about 25 years ago.
I should have taken the time to get out my Canon macro ring flash, but instead just used the pop-up flash on the Canon 7D with the 50mm f2.5 macro lens. I think this weekend I'll do it properly, to eliminate the shadows and flash hot spots.
Anways.....here's the original color version and the B&W version I actually used for my first PAW photo of 2012. Converted to BW with SE Pro2 using the Yellowed-2 preset (I liked the sort of antiqued look). It needs some work however, to bring out the gradations in tone between the brown and dark blacks more clearly.
Links to higher resolution images:
http://www.flickr.com/photos/21743712@N02/6738293565/in/photostream
http://www.flickr.com/photos/21743712@N02/6724262227/in/photostream
Gary
Attachments

jotloob
Well-Known Member
- Joined
- Mar 28, 2003
- Messages
- 1,946
Truck image
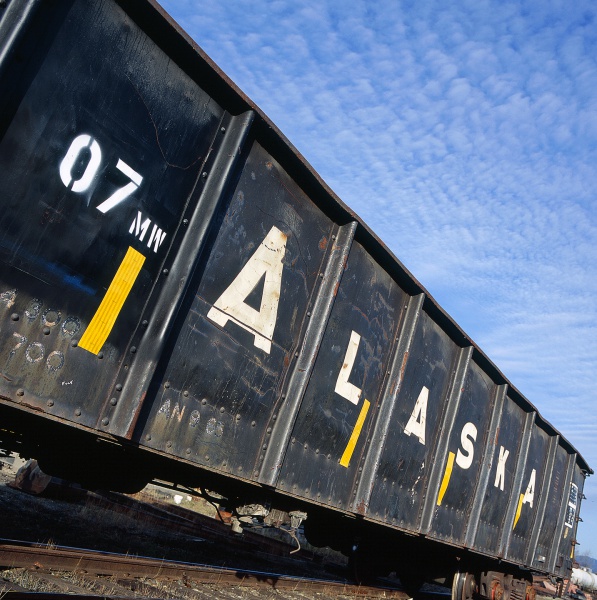
Hi Gary
I do love that truck in the link you gave .
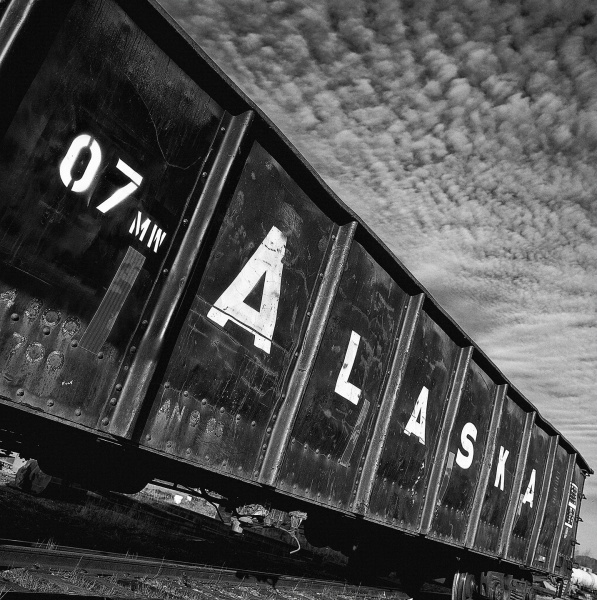
High Sturcture Harsh . Its just great there . You should post that image here in the forum .
And don't be afraid of junk yard images , although I know a member here in the forum , which dislikes that type of images , no , more , he hates these images .
In photgraphy , we should accept all types of motives , but that does not neccessarily mean that we have to love them .
Here a junk yard sample , a more detailed one. The color iriginal is taken with KODAK E100 and scanned by a lab with an IMACON 848 .
SE PRO-2 High Structure soft + yellow filter + some dodging to the big circular metal piece in the foreground .


And how does that look ? with a small frame for presentation ?

Jürgen
Hi Gary
I do love that truck in the link you gave .
High Sturcture Harsh . Its just great there . You should post that image here in the forum .
And don't be afraid of junk yard images , although I know a member here in the forum , which dislikes that type of images , no , more , he hates these images .
In photgraphy , we should accept all types of motives , but that does not neccessarily mean that we have to love them .
Here a junk yard sample , a more detailed one. The color iriginal is taken with KODAK E100 and scanned by a lab with an IMACON 848 .
SE PRO-2 High Structure soft + yellow filter + some dodging to the big circular metal piece in the foreground .
And how does that look ? with a small frame for presentation ?
Jürgen
My latest conversion......
Original color from my 553ELX, 50mm CFi, Velvia 100. Conversion using the SE Pro2 "Wet Rocks" preset.
Higher resolution versions:
Color
http://www.flickr.com/photos/21743712@N02/6758724063/sizes/o/in/photostream/
B&W
http://www.flickr.com/photos/21743712@N02/6758731519/sizes/o/in/photostream/
Gary
Original color from my 553ELX, 50mm CFi, Velvia 100. Conversion using the SE Pro2 "Wet Rocks" preset.
Higher resolution versions:
Color
http://www.flickr.com/photos/21743712@N02/6758724063/sizes/o/in/photostream/
B&W
http://www.flickr.com/photos/21743712@N02/6758731519/sizes/o/in/photostream/
Gary
Attachments


Not taken with a HB, but my favourite camera at the moment, the little Fuji X-100, whose lens has a very HB-like feel to it.
Image converted in Aperture / SE2, neutral film grain, fine art processing, minor sharpening.
Ha, I have the X100s baby brother the X10 and I really like it.
This image was taken on a Mamiya C330f twin lens reflex with standard lens on Kodak Tri-X film. When I developed and scanned the film I was very disappointed with the flat result which bore no relation to the scene that I had seen whilst driving that prompted me to turn around and go back to take a picture of the vista before me.
It was not until I opened Silver Efex Pro 2 and started trying some of the built in profiles I started to see the image come to life and replicate the fantastic image that I had seen with its low sidelighting and stepped changes in the landscape.
I can't remember exactly what I did now but I am sure that I wouldn't have ended up with the result I did without the Silver Efex plugin.
Swissblad
Member
- Joined
- Feb 11, 2008
- Messages
- 280
Ha, I have the X100s baby brother the X10 and I really like it.
I'm glad you like the little X10 - the X-100 has become my faithful companion.
The quality of the optics and digital files is simply awesome - at times I think they are better than that of the Nikon D700.
If only Fuji would resurrect the Xpan!
Nice landscape - I haven't tried SE for my negatives yet - good idea!
Went back to the spot where I took the image above on the Mamiya the other day, as the weather was very nice and clear with a nice sky. I knew from my previous visit that the sun doesn't clear the trees until about 10:30 in the morning so I had plenty of time to drive the 28 miles required.
This time I took both the Hasselblad H1 and also the little Fuji X10 (I really like this little camera).
Image below was cropped from an image on the Hasselblad with the 35mm lens at f32 and at 0.7 secs at ISO 50, I used the mirror lock up and a radio trigger to try to reduce any vibrations whilst it was seated onto my Gitzo tripod.
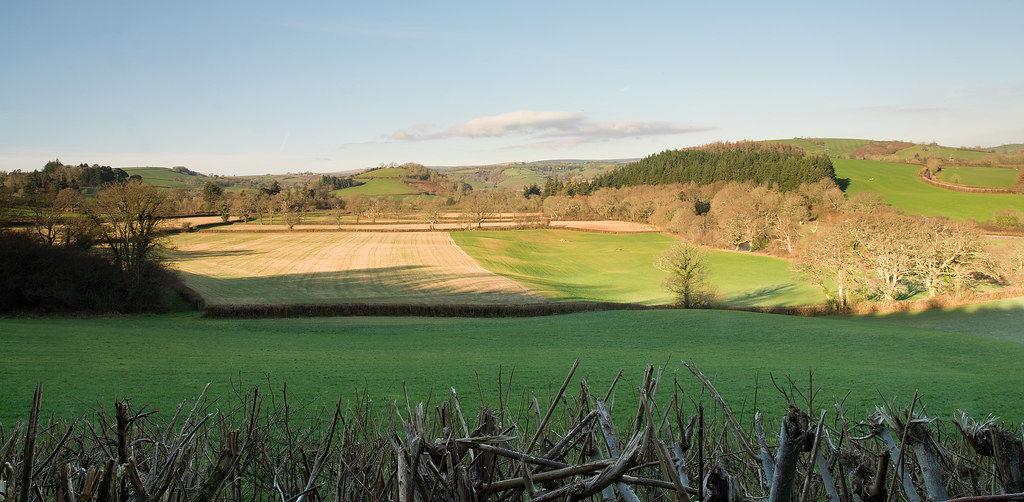
Devon View by Ed Bray, on Flickr
Silver Efex Pro 2 conversion:
I used the 015 Full Dynamic (harsh) as a starting point, then Kodak Panatomic X (32asa) film and then moved a couple of sliders around until I then got the result I wanted, back into Photoshop 'flattened layers' added some USM and in lens correction added -10 vignette to slightly darken corners then added a 3mm black border.
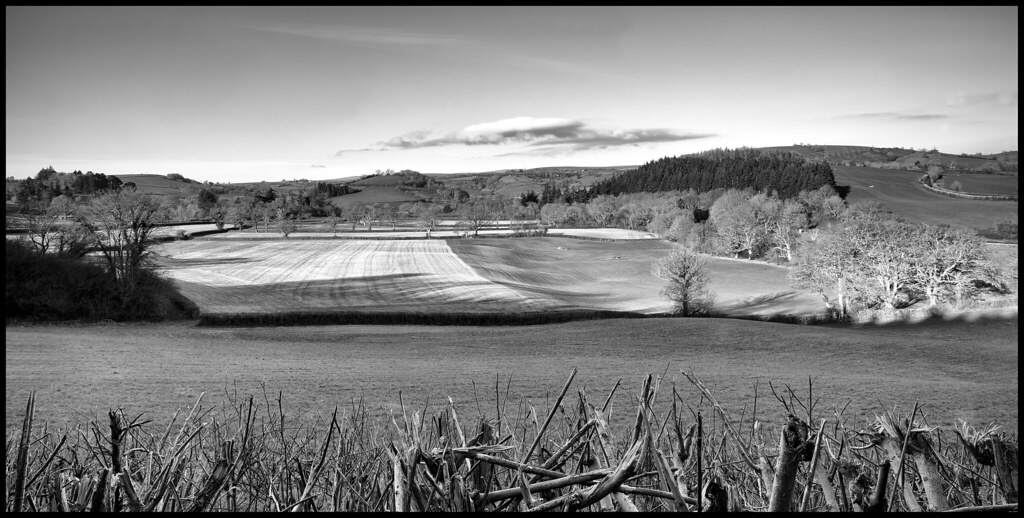
Devon View mono by Ed Bray, on Flickr
This time I took both the Hasselblad H1 and also the little Fuji X10 (I really like this little camera).
Image below was cropped from an image on the Hasselblad with the 35mm lens at f32 and at 0.7 secs at ISO 50, I used the mirror lock up and a radio trigger to try to reduce any vibrations whilst it was seated onto my Gitzo tripod.
Devon View by Ed Bray, on Flickr
Silver Efex Pro 2 conversion:
I used the 015 Full Dynamic (harsh) as a starting point, then Kodak Panatomic X (32asa) film and then moved a couple of sliders around until I then got the result I wanted, back into Photoshop 'flattened layers' added some USM and in lens correction added -10 vignette to slightly darken corners then added a 3mm black border.
Devon View mono by Ed Bray, on Flickr